Tuesday 3 December 2013

Tarsoly by THL Þorfinna gráfeldr

Tarsoly
by Þorfinna gráfeldr

Based on a find from Jämtland
© Melanie Fischer, November 2013


WHAT I HAVE MADE AND WHY
I have chosen to reproduce a Tarsoly (pronounced Tar-shoy), a type of decorated belt pouch, particularly the one that was found at Jämtland, Sweden.

I decided to make this Tarsoly for several reasons. Firstly, to see if I could; and secondly, because I believe that adding the accessories, the small bits, to an outfit is part of what brings it to the next level and helps to turn it from a costume into real clothing.

 …And because I hang out with a lot of “14th century nerds” (their terminology) and need some bling of my own to compete ;)

I have been inspired by a particular individual on Deviant Art who goes by the name VendalRus. I have admired many parts of his kit, but especially the highly decorated accessories he wears and particularly his pouches. In further searches I came across many reproductions of Tarsoly pouches online and found again and again that the reproductions of the type found at Jämtland to be the one that appealed to me the most. However, as the reproductions and/or the castings themselves were all well outside my current financial budget, I had resigned myself to admiring them online, with the thought in the back of my head that perhaps one day I would try casting the pieces myself.

Then one day a friend posted a picture online of a pewter token he had cast using Bondo as the mould. Intrigued, I decided to try making a Bondo mould myself, and in the course of trying to come up with something to cast, I remembered the Tarsoly and thought I’d try to recreate the pouch fittings.


Map showing where the Tarsoly I am reproducing was found.


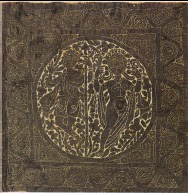
Below is a picture of the Jämtland Tarsoly I decided to try to reproduce:


BACKGROUND
The Tarsoly was part of a Magyar warrior’s kit and was worn suspended from the right side of the warrior’s belt to hold fire-starting elements, food, or other small items. Many recovered Tarsoly were found in the graves of military men and may have originally had connotations of rank amongst Magyar warriors. It is possible that Rus traders and soldiers brought the Tarsoly, along with many other items of Eastern influence, back to Scandinavia from their travels to and from the Byzantine Empire and surrounding regions via the many trade routes established in the 8th-11th centuries.

Most of the Tarsoly pouches recovered from graves are of the type with a solid metal front plate. Only a handful of the type with individual mounts on the front face of the pouch, such as on the Jámtland pouch, have been found. These mounts were usually cast in brass, or occasionally silver. They were likely cast either using the lost wax casting method, or the direct matrix method, both of which had been in use during the Viking Age. 


Map showing the major Varangian trade routes: the Volga trade route (in red) and the trade route from the Varangians to the Greeks (in purple). Other trade routes of the 8th-11th centuries shown in orange.


MATERIALS USED IN CREATING THE TARSOLY

The pouch is constructed of cow leather for the main body and pig skin for the pouch middle and edging. It was sewn with black, waxed linen thread. The mounts are made from pewter.

Due to my current financial budget, I was limited in the creation of my project to the supplies I already had on hand. Therefore, certain concessions had to be made in the construction of the Tarsoly:

As cow leather would have been readily available, and as I had some on hand, I decided to use a small piece of vegetable tanned cow hide to form the main body of the pouch. This leather was however too thick to use as edging. I had a few pieces of chromium tanned leather, but most of it was also too thick or of a colour that did not appeal to me. I was left with two choices, a natural deer skin, or a reddish-coloured suede pig skin. I considered the deer skin but I had ear marked it for another project, so in the end I opted for the pig skin as it is known that the Norse kept pigs so pig skin would have been available.

Unfortunately the pig skin was not large enough for me to cut the edging and the pouch middle all in one piece, so I instead had to do them in four separate pieces, which resulted in a lot more stitching than would have otherwise been required. Similarly, I did not have a piece of vegetable tanned cow hide that was long enough to make the belt loop and strap, so I had to construct it of two pieces and join them together to get the full length I needed.

It is believed that the inside of the Tarsoly may have been lined with linen due to the remains of some linen fibres found with the pouch (although, frustratingly, I can no longer find where I read that to document it!) I chose a piece of rust coloured linen to back the front flap because it complimented the colour of the pig skin and the brown dye I planned to use for the pouch, but I did not have enough of it to line the entire inside of the pouch, only enough for the front flap, so there is a raw edge at the top of the flap that could end up fraying if I’m not careful with the pouch.

I had some black, waxed linen thread left over from a previous leather working project, and decided to use it to stitch the pouch together, though I have read that it is suggested that white linen thread would be more suitable for period reproductions.

Based on the scale in the picture of the extant pieces, the pouch appears to have been approximately 12cm x 13cm (plus strap). It was difficult to get exact measurements of each mount from this picture, and as I wanted to make sure that all the pieces would be the correct scale in relation to each other, I decided to use the measurements I found on a commercial website, Armour and Castings, that does reconstructions of this particular pouch.

I took the pictures of each individual mount and drew them to the size described in the listing, and printed them out to give me a template to use with the Sculpey when making the Masters.


The measurements I used are as follows:

Centre Plate: 48mm x 45mm
Edge Mount: 20mm x 17mm
Flap Mount: 28mm x 28mm
Strap Mount: 12mm x 16mm
Strap End: 40mm x 12mm
Large Bear Mount: 20mm x 17mm

Small Bear Mount: They did not have the smaller animal head mount (that I am calling a Small Bear Mount) so I had to guess and do my best to make it proportional to the Large Bear Mount.

I used Fiebing’s brand alcohol based Mahogony leather dye to dye the cow skin.

I used Bondo to create the moulds and I cast the mounts in pewter.

THE PROCESS OF CREATING THE POUCH MOUNTS

MAKING THE MOULDS

First I created masters from Sculpey, a modern polymer clay that you can bake in your oven. It is fairly easy to work with and can be sanded or carved further after hardening. You can even add pieces to a baked piece and re-bake it, allowing you to build up layers in stages rather than all at once.

I used plastic Tupperware-like containers as the container for my moulds. I created my moulds using Bondo. Bondo is a polyester resin that hardens when mixed with a catalyst that causes an endothermic reaction. While Bondo is not a period medium, the technique used to create the moulds and cast the items from them do not differ all that much from period methods. The Bondo takes the place of the clay that an original object or wax copy would be pressed into.

To make the moulds, I mixed up just enough Bondo and hardener for one half of the mould and poured it into the plastic container. Before placing my Sculpey master into the Bondo, I sprayed it with WD-40, a spray lubricant, to act as a mould release (no mould release is required between the Bondo and the plastic container.) It is important not to over-spray your masters or the excess liquid can create bubbles and cause a subsequent loss of detail in the mould. It is also important to be sure that your entire master is sufficiently covered with the mould release or it can stick in the mould and it it-self may break, or the mould may break, when trying to remove it.

Once the master was coated with WD-40, I pressed it into the Bondo, taking care not to push it so deep that the Bondo could seep over the top edges of the master. The Bondo was left to cure between 10 and 30 minutes, depending on the amount of hardener added to the Bondo (more hardener = faster curing time.)

After the first half of the mould cured, I created a cone-like shape out of plasticine and pressed this from the top edge of the mould down so the tip would just touch the top of the master, making sure to press the edges down so there were no spaces, or ‘undercuts’, between the bottom half of the mould and the plasticine. This cone of plasticine creates the channel or ‘sprue’ needed to pour the molten metal in when casting. Once the plasticine sprue was in place, I sprayed the entire surface of the first half of the mould, including the plasticine and the back of the master, with the WD-40, ensuring that everything was covered. If there is no detail on the back side of your master, you can be more liberal with your use of WD-40 at this stage, as there is no detail to lose.

The second half of the mould was again left to cure for approximately 10 minutes, to the point where it had hardened, but still not fully cured. At this stage, the Bondo is still hot so you need to be careful. Using an exacto-style knife, I sliced off a thin layer of the Bondo along all the edges of the mould where the two halves overlapped. I have found it is slightly easier to do this before the Bondo is fully cured, but it can also be done once the Bondo has fully cured and is cool. This removes any places where the Bondo from the top half of the mould may have seeped down around the edges along the bottom half of the mould. By cutting away this overlap, we reveal the line between the two halves of the mould and can insert the edge of the knife into the line and carefully work it around all the edges and separate the two halves of the mould.

Lastly, I removed the master from the mould and checked for any problems in the detail such as air bubbles or holes that could be quickly repaired by adding a dab of bondo to fill them in. At this point, any areas that required additional clean-up were sanded and/or carved until the desired result was reached, and all holes for the mounting posts were drilled into the backsides of each mould. As the second half of the mould always picks up a faint outline of the master, it is easy to place the mounting posts and drill them in appropriate places.

I chose to drill the posts rather than make them out of Sculpey because it is infinitely easier to make perfectly straight posts with a drill than it is with a thin piece of Sculpey that will need to be reinforced with a pin of some sort to give it structural strength before baking. To allow air to escape when pouring the molten pewter into the mould it is important to add tiny air holes to the posts. I did this using a pin drill and a tiny drill bit. It is important that the air holes are as small as possible so that your molten pewter does not flow all the way out your air hole to the back of the mould where it can trap the casting in the mould.

CASTING THE MOUNTS
I used a cast iron pot to melt my pewter in, placing it on a burner on my stove at about ‘8’ until it had melted and then reduced the heat to about ‘5’. It is absolutely imperative that you make sure that no water can come into contact with your molten pewter, as it can cause a steam explosion (as the water evaporates) and send molten pewter flying in all directions. Protective clothing, glasses, and gloves are recommended.

Unlike soapstone moulds, holding the Bondo mould by hand while pouring generally does not create enough of a seal between the two halves of the mould. Using spring clamps to hold the mould together solves this problem and also makes it easier to hold onto the mould, which can get very hot. Usually I used between 2 and 4 clamps, depending on the number of masters ganged together on each mould. This helps create a tight seal between the two halves to minimize excess pewter around the edges of the cast item, called ‘flash’.

A bit of talcum powder dusted over the mould aids in the flow and release of the pewter. I dusted my moulds every three or four pours.

Once the mould was powdered and clamped together, I took a small amount of pewter in my ladle, just a little bit more than was necessary to fill the mould, and poured it into the sprue in one smooth pour until it filled. It is important to pour it all at once as the force of the pewter pouring from above is what helps push the molten pewter deeper into the mould.

The pewter was then left to cool until it had ‘set’. You can tell when the pewter has set by looking at the pewter in the top of the sprue. If it has dulled from the chrome-like shininess of its molten state to a slightly more grey, less shiny colour and is solid, it has cooled enough to be removed from the mould. If not, it needs more time. With practice, it becomes easy to recognize when your pewter has cooled enough to be removed.

Once the pewter had cooled enough, I removed the clamps from the mould and separated the two halves. Using a knife, I fit it under the main body of the casting and pried it gently straight upwards to pull the posts out of the mould without breaking them or bending the main body of the casting. I then snapped or snipped off the sprue and returned it to the pewter pot, and left the casting to cool completely before final cleanup.

If there was any flashing or other areas that needed to be removed from the cast item, I would snip and file them using small jeweler’s files until they were cleaned up and ready for mounting.


WHAT I LEARNED FROM THIS PROJECT

From a hands-on perspective of actually making the Tarsoly

About Bondo Moulds:

While Bondo is great for making a quick mould for a limited run, there are disadvantages to using it as well:
A Bondo mould does not produce an end result as fine as what can be achieved using a soapstone mould. Fine detail is often lost or bubbled when air gets trapped under the master. I have been experimenting with ways to combat this, and have had some success by brushing on a thin layer of the Bondo to the face of the master directly, and then placing that into the rest of the Bondo mixture to avoid catching air between the face of the master and the mixture.

The Bondo holds the heat a lot longer than the soapstone. Subsequently it takes longer for the pewter to set in the mould, and thus longer between each pour. I tested a Bondo mould against a soapstone mould and found I was able to do approx. 3 pours in the soapstone mould for every 1 pour into the Bondo mould, a significant difference in time. This has led me to the conclusion that if there are going to be a large number of the item cast, it may be worth the effort to carve the mould in soapstone.

The Bondo mould also reacts to the heat more and develops more flex the hotter it gets, absolutely necessitating the use of clamps in order to hold the two halves of the mould together tightly enough to get a decent seal. Even using the clamps, the Bondo moulds also seem to result in a lot more ‘flashing’ on each cast, resulting in a lot more clean up required after each pour. This also lends weight to the conclusion of using a soapstone mould for items that require multiple castings, as cleaning up each casting can take considerable time.

About Attaching Mounts:

Much to my consternation, I discovered that, even when you think you have your mounts lined up exactly where you want them to go, and you press the posts on the back of the mounts into the leather to make marks to punch with your awl, somehow the mounts can still end up not quite straight or sometimes even downright crooked. This happened with the mounts on the strap, where a few of them are a bit angled and so don’t sit perfectly in line with the rest of them. Fortunately it is only a minor difference and not glaringly obvious when looking at it. The ‘clasp’ section on the inside front of the pouch on the other had is considerably crooked and the part that disappointed me most of all with the entire project. One edge had already become rounded due to a second too long on the belt sander, and somehow, even after carefully lining it up, that same side ended up lower than the other, emphasising it even more. I considered moving it, or making a new one, but did not for two reasons. The first being, I did not want visible holes left in the front of the pouch that would result if I moved the clasp; the second being that the amount of cleanup required to make that piece useable was quite a lot, and considering that I already didn’t want to move the clasp to avoid the extra holes, it did not seem worth the effort to replace the existing one in the same position. So, since it is not visible when the pouch is closed, which is how the majority of people are going to see it, it is more of an unfortunate annoyance to me than an overall flaw.
 
WHAT I WOULD DO DIFFERENTLY NEXT TIME

Sculpey, the material I used to create my masters, is deceptive. What seems perfectly thin and light enough in Sculpey often results in a pewter casting that is thicker than desired. If I were going to try making another Tarsoly from scratch, again using Sculpey for the masters and Bondo for the moulds, I would make sure to make the masters much thinner than I did this time around. I think that most of the mounts could stand to be almost half as thick as they are. That being said, at some point I think I would someday like to go back to carving the masters in soapstone, as it is a period method and makes it easier to cast multiples.

For the sewing of the pouch, I would endeavor to do the edging and pouch middle out of one piece of leather to cut down on the amount of stitching that was required. Using separate pieces for the edging meant I had to go over the same section twice as many times as I would have had to with only one piece. I would also prefer to use leather that would more likely have been used in period over the suede I used this time.

I would also use a larger piece of linen so that it would line the entire inside of the pouch and cover all the folded over mounting posts from all the mounts. This would not only be more aesthetically pleasing, it would prevent fraying of the open edge of linen, and provide a layer of protection between the mounting posts that stick through the leather and whatever you may put in the pouch; to avoid scratches from the posts, and to avoid catching the posts when you put something in or take something out of the pouch.

It would also be nice to be able to source or create some period dye or oils to use on the leather instead of the Fiebing’s brand commercial dye I used.


LIST OF SOURCES

http://vendelrus.deviantart.com/

www.armourandcastings.com


Graslund, Anne-Sofie "Beutel und Taschen" Birka II:1: Systematische Analysen der Graeberfunde  ed. Greta Arwidsson


Carlson , I. Marc  Leatherworking of the Middle Ages  © March 3, 2013; Web; Accessed: November 2013; http://www.personal.utulsa.edu/~marc-carlson/leather/leather.pdf

Söderberg , Anders  “Scandinavian Iron Age an Early Medieval Ceramic Moulds – Lost Wax or Not or Both?” Exarc, ©2012; ISSN: 2212-8956; Publishing date: September 15, 2012; Web; Accessed: November 2013; http://journal.exarc.net/issue-2012-3/ea/scandinavian-iron-age-and-early-medieval-ceramic-moulds-lost-wax-or-not-or-both

http://en.wikipedia.org/wiki/File:Varangian_routes.png

http://www.hurstwic.org/index.html

http://www.regia.org/leatwork.htm


Thursday 21 November 2013

PATTERN RECOGNITION

PATTERN RECOGNITION:
Evolution of Large-Scale Textile Motifs


THL Asa Gormsdottir / Eve Harris, October 2011

TABLE OF CONTENTS
1. Preamble
2. Sassanid and Coptic Textiles
3. Byzantine Fabrics
4. Lampas and Palmettes
5. Italian Heraldic Fabrics
6. Pomegranate Velvets
7. Fragmentation: 16th Century Fabrics
8. Turkish Brocades
9. Conclusion
10. Bibliography

OVERVIEW
Part of the enjoyment in historical recreation is making clothes appropriate to one’s preferred
period(s) of study. Choosing appropriate plain or subtly patterned fabrics (such as herringbone
and lozenge twills) in wool, linen or silk has become almost a matter of fact for many
experimental archaeologists when recreating elements of European dress, but often difficulty
arises when a large-pattern textile is contemplated.

The intent of this paper is to develop an elementary pattern guide to recognizing and choosing
larger-pattern fabric designs appropriate to royalty, upper class and ecclesiastical dress during
the generally accepted SCA period of study, 600-1600 A.D. Sassanid and Coptic designs,
Byzantine heraldic fabrics, Italian and Turkish patterns will be reviewed in chronological order
and their characteristics discussed. In addition to images of extant fabrics and secondary
painting sources, images of modern fabrics possessing similar characteristics are also included.

What is Pattern?
Pattern can be defined as a repeating sequence of elements organized in a predictable way.
Simple or complex, a perfect pattern is mathematically precise and consistent. Keys to pattern
recognition include shape, content, embellishments and colour.

SASSANID AND COPTIC TEXTILES
In 600 A.D. weaving was arguably an already mature art. While refinements such as special
weaves (lampas and velvet) and greater perfection in dyeing were yet to come, sophisticated
repeat patterns, in silk and in wool-on-linen, sometimes using gold thread, had long been
produced in Egypt (including Alexandria) and Persia or imported from China via the Silk Road
(Volbach, 15-16). Weaves from Babylon and Assyria (present-day Iraq) were prized in the
Roman Empire (Volbach, 9).

Persian (Sassanid, now present-day Iran) and Egyptian (Late Classical and Coptic) designs
exercised the greatest influence over the future Byzantine Empire’s renown in silk manufacture.

“Sassanid (third to seventh centuries A.D.) textiles, which greatly influenced Indian silk
brocades of a later period, were known for their beauty and unique patterns. The
designs were the result of a fusion of three ancient textile traditions – the Mesopotamian,
Chinese and Hellenic…motifs used extensively in different forms were the lotus, lion,
bull, elephant, tree of life, and vase of plenty among others.” (Agrawal, 35-36)

The design scheme of surviving Sassanid textiles almost exclusively consists of heraldic
animals and noble scenes presented in bordered roundels. The roundel borders are filled with
smaller disks resembling coins. The colour scheme is very rich: its palette is essentially identical
to that found in Persian carpets up to present day. Deep rich reds, blue-greens, golden yellows,
creams and blacks are all common, and even in their faded state the extant Sassanian textile
fragments exude warmth, vigour and dignity.


Sassanid, 6th-7th C. Silk twill. Shows the royal senmurv (Volbach, Plate 21)


Sassanid, 4th C. Silk twill. Pheasant 
fragment 
(Volbach, Plate 23)


Central Asia, 9th C. (carbon dated)
Polychrome silk samite. Roundel is 11' 3/4
diameter. “…still retains the elegance of the
Sassanian earlier models”. From a Carlo
Cristi exhibit at the International Asian Art Fair
http://asianart.

Meanwhile, Egyptian textiles in the fourth and fifth centuries A.D. still contained Classical motifs.
The graceful examples shown below are delicately woven and in sophisticated taste. In the first
example, the nereid/sea-monster motif alternates direction with each row. As well, the motifs in
each example are enclosed in a roundel with a border. Cellular arrangement of motifs in
roundels, palmettes or medallions is a common feature of large-pattern textiles
throughout many centuries.


Believed Egyptian, 4th-5th C. Silk twill.
“Nereids riding sea-monsters” (Volbach, Plate 1)


Egyptian, 4th C. Wool on linen.
“Venus and Adonis” (Volbach, Plate 19)

However, the calm, naturalistic air of these scenes and their Classical content was ending:

“Two main factors brought the naturalistic style favoured by antiquity to an end: the
collapse of the Western Empire in the fifth century and a change in economic structure
as a result of which a new social order was established and to which the language of art
had to be adapted.” (…) “the old classical motifs were gradually replaced by new
subjects drawn from Eastern mythology, by portraits, and, above all, by Christian
themes.” (Volbach, 49)

Initially, the Coptic work seems to flounder under the influence of the Sassanian textiles, groping
into the Christian themes with coarse, almost childishly drawn figures using primary tones of
red, orange, blue in conjunction with white and black accents. These transitional fabrics soon
developed the fixed frontal gazes and rigid poses associated with Byzantine iconography.


http://www.christies.com/LotFinder/LotDetailsPrintable.aspx?intObjectID=5193066
Coptic, 6th-9th C. Border fragments. “Two gold bands, and central polychrome band
with red ground, woven with roundels enclosing a stylized horseman, with animal
below and behind, a snake above, a smaller figure carrying a bird in front, alternating
with conjoined flower filled amphorae and stylized foliate roundels”


http://christies.com/lotfinder/lot_details.aspx?intObjectID=5193082
Coptic, 7th-9th C. Fragment with a red ground, “woven
with rows of roundels and foliate motifs, filled with
stylized leaves and flowers motifs, with remains of
bright polychrome.” 32 in. (81 cm.) long

BYZANTINE FABRICS
Labyrinthine politics, suffocating bureaucracy - and decadent luxury - are synonymous with the
Eastern Roman Empire, in succeeding centuries renamed the Byzantine Empire:

“…the splendour of the Byzantine court is its applied art. (…) (Byzantine) textiles … were
of such amazing quality that the demand for them was universal.” (Volbach, 122)

Yet the designs, motifs and colour palette were stolen wholesale from Sassanid originals,
including such mythological animals as the senmurv1 and hippocampi2. Most 7th through 9th
century Byzantine fabrics exhibit exceptional kinship and derivative relationships with surviving
Sassanid originals.

“Symbolic beasts copied from Eastern fabrics also played a decisive role in architectural
sculpture in Italy, France and Spain, and the lion, the eagle and the elephant, all
symbols of sovereignty, were the main motifs in the court art of Byzantium.” P. 15

Winged horses, griffons, eagles and other birds were universally popular and were used for
hundreds of years.

“The double-headed eagle, an ancient Mesopotamian motif and the royal emblem of
Byzantine kings, was also the royal insignia of the Mysore state….It was also a popular
ancient Egyptian motif symbolising power.” (Agrawal, 69)

Like the Sassanid fabrics previously seen, the essential Byzantine design consists of bordered
roundels, joined by smaller disks or lozenges to other roundels in a grid. “True roundels…(are)
the almost invariable pattern of Byzantine silks”. (Volbach, 13) Within these roundels are
heraldic animals, singly or in pairs (normally statant and regardant).


Byzantine, 7th C. Hippocampi silk. (Volbach, 57)


Byzantine, 7th C. Silk serge reconstruction. “Lozenge pattern
with leaves in the shape of a cross”. (Volbach, Plate 53)

Note the similarities of the Hippocampi silk above with its Sassanid ancestor in the previous
section. The fairly simple design of the second example above, in faded purple and gold, is
probably one of the few Byzantine fabrics for which a modern substitute could be obtained. In
the current textile market, true heraldic fabrics are uncommon and hard to find.


Byzantine, 9th-10th C. Lions. Purple silk serge
(Volbach, Plate 66)

Likely Byzantine, 11th C.
“Reconstruction of the pattern on the silk
cloth recovered from the tomb of Edward
the Confessor in Westminster Abbey.”
(Crowfoot, 86-7)


Byzantine, 11th C.
Two griffons. Silk serge and
wool (Volbach, Plate 69)

While the polychromatic scheme is changing, the Sassanid character of these Byzantine fabrics
is still easily recognizable.

LAMPAS AND PALMETTES
Although they would remain popular as an ecclesiastical pattern for centuries yet, in the 10th
century the once colourful roundel-based patterns had essentially run their course. New, largely
monochromatic patterns using palmette grids were coming into favour.

“…Geometrical patterns, based on palmettes for example, were becoming much more
fashionable. A preference was shown for single colours, and, as a result, delicate
intermediate tones gradually disappeared.” (Volbach, 143)

These intricate designs found a showcase in lampas. A compound twill, lampas resembles our
modern-day damask.

“It is uncertain where in the Middle or Near East lampas weaves originated, although the
technique had certainly evolved in Arab workshops by the late 10th century… the cloth
construction… subtly exploited the lustrous quality of the fibre by contrasting the pattern
with that of the ground. This was achieved by bringing the main warp to the surface
of the cloth…” (Crowfoot, 107)

The following Byzantine examples represent “proto” lampas and lampas. The “proto” lampas
had more of a textured design:

“Many of these silks were used for vestments…They are a monochrome pale grey,,
greenish-yellow, red, green or blue-black, with textured design and a characteristic
shimmer like that of satin. The complicated patterns are similar to those on the multicoloured
fabrics: palmettes, rosettes, acanthus leaves, flowers and contiguous
medallions” (Volbach, 145)

The rich and varied colour schemes of the roundel fabrics seen in previous centuries had
(temporarily) vanished.

“…lampas-woven fabrics in the 11th century (were) usually in monochrome white, ivory,
yellow, green or more rarely purple. (…) By the end of the 11th century a more colourful
range of lampas cloths was being woven in western Europe, principally Sicily and Spain,
and metal thread was introduced to highlight details of the patterns…” (Crowfoot, 107)


Byzantine, 11th C. Chasuble of Bishop Willigis (975-1011)
“Two different types of palmettes in pointed oval surrounds”
(Volbach, Plate 70)


Byzantine, 11th C. Slashed silk lampas.
Bird roundels. (Volbach, Plate 71)

According to Santangelo, “The commonest type (of lampas or diasprum) … is one without
circular frames, showing parallel and alternating rows of confronted birds and quadrupeds,
separated by palmette-shaped leaves.” (Santangelo, 19)

These palmettes would prove to be an enduring component of many fabrics, whether undulating
in flowing s-curves (the proto-lampas above), in squat little rows, or as stand-alone polychrome
emblems, especially in Turkish and modern Indian fabrics.


Venetian, before 1329. Green brocade. Contains “four
different types of palmettes”. (Santangelo, Plate 21)


Florence, early 16th C. Green velvet, with pattern
of “interlaced chestnut branches on ivory silk
ground” (Santangelo, Plate 49)

The 16th century green and ivory velvet above displays the continuing s-curve style.3


Venetian, before 1329. Red silk, “brocaded with pine cones in relief
and lotus plants on ground speckled with gold” (Santangelo, Plate
23)


Florentine or Venetian, 1565-1600. Brocaded chopines.4
http://aands.org/raisedheels/Pictorial/moda2.jpg


Giovanni Bellini, Madonna and Child Enthroned, 1488
Venice. (Jestaz, Plate 90)
Note the dark red wall hanging patterned in black with green
and white


Modern brocade with similar palmette/medallion characteristics
Fabricland, c. 2009

ITALIAN HERALDIC FABRICS
While cities like Sicily, Lucca and Venice had been producing silk fabrics for hundreds of years,
by the late 13th century their works had achieved parity with the acknowledged industry leaders:
Byzantine and Asian fabrics:

“The 1295 inventory of the Vatican Basilica mentions Luccan, Genoese and Venetian
textiles on a plane of absolute equality with panni di Romania, produced in regions
subject to the Byzantine Empire, and with panni tartarici, produced in the Islamic
countries of Asia.” (Santangelo, 17)

Their technical excellence is shown in the following formal compositions of palmettes and
confronted animals, the first being brocaded in silver which has since tarnished:


Lucca, first half of 14th C.
“Diasprum…showing confronted peacocks
and gazelles brocaded with silver”
(Santangelo, Plate 10)


Venetian, 14th C. “Gold brocade on red
ground, with touches of blue” (detail)
(Santangelo, Plate 25)


Varanasi silk, early 20th C. (Agrawal, 133)
While lacking heraldic elements, the red ground
and brocaded motifs with small flowers above
are similar to the 14th C. Venetian brocade

At least until the Ghibbeline occupation in 13145, Luccan textiles were favoured above the
products of Venice:

“The patterns and motifs take on new life even when they are merely adaptations from
older symbols and motifs. Heraldic emblems lose the immobile fixity of the coat of arms
…” (Santangelo, 30)


Lucca, 14th C. Silk with pattern of birds
(Santangelo, Plate 9)


Modern heraldic silk fabric. Lions and palmettes. Dark red ground; warm beige
detail that appears golden in some lights. Courtesy Susan Carroll-Clark by way
of Designer Fabric Outlet, c. 1999

Succeeding heraldic fabrics of the later 14th and into the 15th centuries display a growing
freedom and tendency to dispense with the ordered X/Y grid in favour of diagonal compositions
full of life. The design and chromatic implications from the rise of Genghis Khan (re-establishing
trade links throughout Asia and thus to Europe) and the fascinating fruits of Marco Polo’s travels
are noted:

“The colours of the oriental cloths also display a different palette from those produced in
western centres, and the tints of pink, turquoise, orange and green were to have almost
as an important influence on the colouring of textiles, particularly those produced in
Italian cities from the second quarter of the 14th century, as the exotic patterns were to
have on cloth design.” (Crowfoot, 100)

The predictable vertical or horizontal scrolling shapes are transformed into diagonal scenes full
of movement:


Lucca, 14th C. Dalmatic (detail) (Santangelo, Plate 15)

Many such inspired textiles contain “humourous” scenes with “good-natured caricatures” and
fantastic animals “who rush down from the row above” (Santangelo, 30). Of Luccan textiles,
“The motifs are Gothic: castles, galleys, heraldic emblems, hunting scenes, especially with
huntresses, fabulous and real animals, all combined in light and airy compositions” (Santangelo,
33)

Not heraldic in composition, but certainly in the same free, diagonally driven spirit and
complementing the great pomegranate velvets are the following delightful silks brocaded with
gold.


Venetian, early 15th C. “Tunicle, brocaded with gold” (detail)
(Santangelo, Plate 28)


Venetian, 15th C. Pile-on-pile velvet, brocaded with gold
(Poli, precise citation lost)

POMEGRANATE VELVETS
A popular textile motif found in many paintings of the 15th and 16th centuries, the pomegranate
motif is a fat, pine-cone shape covered with petals or scales. This central element can also be
described as an artichoke, a pineapple, a lotus flower, a poppy seed head or a tree of life.

Typically the heart is embedded in a broad, many-lobed border, often enhanced with florets or
leaves.


Most often used in velvets, the pomegranate motif typically appears in a united, vertical design
of fleshy stalks or branches. Some examples show the motif meandering along the fabric on its
own independent stalk.


Pisanello. Design for a velvet.
Before 1455.
(Santangelo, Plate 15)


Italian, early 16th C. Brocaded velvet
(Santangelo, Plate 44)


Florence, 3rd quarter, 15th C.
Vestment of Pope Nicholas V
(Santangelo, Plate 51)

Pomegranate patterns are frequently grand in scope. It is not uncommon to see a single motif
as broad as two hand span. On some surviving vestments, the pattern is so large that the
garment simply can’t do it justice. Heavily banded with orphreys6, many chasubles resemble
disjointed puzzle pieces than a coherent design.

Many surviving or painted pomegranate fabrics have gorgeous jewel-tone colour schemes, such
as garnet, deep brown and purple, all with gold. The Magdalen below sports a particularly delightful example.7 In addition to countless paintings, pomegranate patterns are found
throughout the Lady and the Unicorn tapestries (late 15th century) and on the mid-15th century
Ricasoli-Adimari Marriage Chest (Santangelo, Figures 21-22).


Jan Van Eyck, 1436. The Virgin of Chancellor
Rolin (detail)
“…attired in an opulent, brownish, mink-trimmed
brocade coat with a raised pomegranate pattern
in gold thread.” (Schneider, 36)


Rogier van der Weyden, c. 1450
Isabelle du Portugal
http://en.wikipedia.org/wiki/File:Isabell
a_of_portugal.jpg
Visited October 12, 2011


Rogier van der Weyden
Magdalen (right wing of the Braque
family triptych), 1452
http://www.ibiblio.org/wm/paint/auth/w
eyden/ Visited October 10, 2011

During the second half of the fifteenth century, as the motif matured, the colour scheme became
more monochrome. The patterns lost much of their exuberance in exchange for studied
elegance. Some designs appear almost incised, as by an engraving tool.


Florence, early 16th C. “Passerini Cope, worn by Leo X while
celebrating mass in the Church of San Francesco at Cortona, on
May 28, 1515” (Santangelo, Plate 48)


Hans Holbein, 1527
Portrait of Sir Henry Guildford, Windsor
(Laver, Plate 15)

As well, ferronerie (ironwork) designs appear. In the second example, increasingly abstracted,
only a fragment in the centre of each motif retains its original character, while the overall design
shows a tendency to break away diagonally from left to right.


Agnolo Bronzino, c. 1545
Eleanor of Toledo and her son Giovanni de’
Medici (Jestaz, Plate 132)8


Milan, second half of 15th C.
(Santangelo, Plate 56)
Crimson velvet, “showing ferronerie pattern”

FRAGMENTATION: 16th Century Fabrics
During the last quarter of the 15th century, the flowing houppelandes, huques and giorneas that
so beautifully showcased the pomegranate velvets and colourful brocades were increasingly
giving way to more form-fitting fashions, often in more sombre tones. After 1525 this movement
was particularly influenced by the costume of Spain, the acknowledged economic and military
superpower of Europe9:

“The dominant feature of Spanish costume was its sobriety and austere elegance.
Though rich, the stuffs used were always in dark tones…This fashion spread (…)
through Italy, and through the courts of Henri II and his sons in France. (…) The solemn,
heavy effect produced by these stiff garments did not preclude luxury…”10

This sober Spanish aesthetic was expressed through tautly fitted doublets, stiffened and boned
“bodies” and heavy cone-shaped skirts. Plain velvets and smooth satins in colours of black,
pearl-grey, white, dark red and purple, cut to fit, were trimmed in black and gold with narrow
braids, embroidery or passementerie and tightly secured with costly buttons. Intricate pink-andslash
patterns11 and strapwork added textural interest.

The focus was no longer on the pattern of the fabric but the fit of the clothes and the richness of
the trimmings, complemented by ruffs, linen undergarments heavily embroidered in double
backstitch, and monumental jewellery. The excesses of costume, temporarily restrained, simply
found another mode of expression. In this environment, except in the Italian city states,
particularly Venice, large-pattern textiles faltered and increasingly took a (literally) backdrop
role:


The Infanta Isabella Clara Eugenia with Magdalena Ruiz
Felipe de Liaño, c. 1584 (Laver, Plate 27)


Erasmus of Rotterdam, c.1523. Hans Holbein the Younger
(Schneider, precise citation lost)

Note the stilted, alternating rows of separate gold and silver motifs on the Infanta’s skirt against
the majestic, older red and gold brocade wall hanging of great palmettes in a network of
boughs. In the latter example, Erasmus is portrayed in scholarly black against a dark green
heraldic silk of griffons, brocaded with gold and touched with raspberry that was probably 50-
100 years old at the time.

At the same time, perhaps reflecting general surfeit, velvet patterns became increasingly
stylized and empty of meaning. Several 16th century cream or beige velvets have survived; their
motifs much smaller and increasingly stylized, blurred by the velvet pile.


Genoa, 16th C. “Cut and uncut brown velvet on yellow ground
(portion). Small floral motifs arrayed in parallel lines”.
(Santangelo, Plate 62)


Genoa, 16th C. Velvet. “Plants and animals in red and green on
cream ground”. (Santangelo, Plate 59)

16th century Italian silks show simplified, miniaturized motifs, stylized past the point of
recognition. Descriptions include “lopped bough” (Dupont-Auberville, 27). Note the small silver
and gold repeats in the violet silk below.


Italian, 16th C. Violet silk, “motifs alternately in gold and silver”
(Santangelo, Plate 69)


Venetian, 16th C. “Polychrome velvet on green satin ground”
(Santangelo, Plate 73)

TURKISH BROCADES
Despite the prevailing pretty, empty fabrics of the 16th century, the old strain of magnificence
continued in Turkey and Venice, who enjoyed close economic ties. Brilliant velvets in bold
colours embellished with gold thread, depicting palmettes, medallions, fern/feather and flower
motifs appear both in Venetian paintings and on extant fabrics, including several caftans in the
Topkapi museum.


Iran, Safavid, 16th C. Velvet fragment.
http://www.textilemuseum.org/AheadofHis
Time/index.html
Visited October 13, 2011


Paolo Veronese, Marriage at Cana
(detail), 1562-1563 (Jestaz, Plate 115)


Gentile Bellini, Turkish Painter, 1501
http://media.web.britannica.com/ebmedia/
98/13098-004-80234E7F.jpg
Visited October 14, 2011

The medallion borders in Bellini’s painting contain the same small disks as did the Sassanid
fabrics in the same region one thousand years previously.


Turkey, 16th C. “Kaftan fragment, lampas, ogival”
(Agrawal, Plate 25)


Gujarat/Varanasi, late 18th C. ”This motif, the Pankha Buta, is influenced
by the Turkish brocade of the 17th century.” (Agrawal, Plate 70)

CONCLUSION
Inhabited roundels, palmettes, heraldic beasts and pomegranates are important motifs of 6th
through 16th century large-pattern silk and velvet textiles. Using primary and secondary sources,
this paper has reviewed their chronology and characteristics, and some socio-economic factors
contributing to changes in pattern fashions. The many beautiful fabrics, surviving or preserved in
contemporary paintings and mosaics, are testament to the maturity and excellence achieved by
the weaving industry long before the SCA period opens, and their classic patterns endure today.
With internet access to suppliers all over the world, today’s fabric shopper has access to more
variety, colour choices and price ranges in textiles than ever before. Armed with a basic
understanding of dominant patterns and colour schemes worn by the European nobility and
clergy from the Byzantine empire through the Elizabethan period, artisans can make more
informed fabric choices and produce ever more realistic garments that would truly look at home
in a great painting.

BIBLIOGRAPHY
Agrawal, Yashodhara. Silk Brocades. India: Roli & Janssen, 2003.

Crowfoot, Pritchard and Staniland. Textiles and Clothing c. 1150-1450. London: The Boydell
Press, 1992. This edition 2001, reprinted 2004.

Dupont-Auberville, M. Classic Textile Designs. Trans. from L’Ornement des Tissus. London:
Studio Editions, 1989. Reprinted 1996.

Jestaz, Bertrand. Art of the Renaissance. Trans., I. Mark Paris. New York: Harry N. Abrams,
Inc., Publishers, 1995.

Laver, James. Le Costume des Tudor a Louis XIII. Paris: Horizons de France, 1950.

Poli, Doretta Davanzo. I Mestieri della moda a Venezia. Venice: Conzorzio Maestri Calzaturieri
Del Brenta, 1995.

Santangelo, Antonino. Treasury of Great Italian Textiles. New York: Harry N. Abrams, 1964.

Schneider, Norbert. The Art of the Portrait: masterpieces of European portrait-painting, 1420-
1670. Taschen, 2002.

Volbach, W. Fritz. Early Decorative Textiles. Trans., Yuri Gabriel from Il Tessuto nel’Arte Antica.
Middlesex: The Hamlyn Publishing Group, 1969.

http://aands.org/raisedheels/Pictorial/moda2.jpg . Visited October 13, 2011

http://asianart.com/exhibitions/aany2006/carlo3.html. Visited October 8, 2011

http://www.christies.com/LotFinder/LotDetailsPrintable.aspx?intObjectID=5193066 Visited
October 11, 2011

http://christies.com/lotfinder/lot_details.aspx?intObjectID=5193082 Visited October 11, 2011

http://www.ibiblio.org/wm/paint/auth/weyden/ Visited October 10, 2011

http://www.textilemuseum.org/AheadofHisTime/index.html, Visited October 13, 2011

http://media.web.britannica.com/eb-media/98/13098-004-80234E7F.jpg
Visited October 14, 2011

http://en.wikipedia.org/wiki/File:Isabella_of_portugal.jpg Visited October 12, 2011


1 Ancient mythological animal, part wolf or dog, part eagle or peacock
2 Mythological; part horse, part fish
3 A simple dress in a similar velvet, grass-green on fawn silk velvet, was sighted at Fall Coronation, 2011
4 Fabric-covered chopines (high-heeled shoes worn primarily by Venetian and Spanish ladies in the 15th century and for some time afterward) can be an excellent source for fashionable textiles
5 Banished as a result of the occupation, “three hundred families of Guelph (Luccan) weavers transferred their looms to Venice…” (Santangelo, 28)
6 Decorated bands, often embroidered in metallic threads and jewelled
7 Magdalen and Salome figures are generally dressed in the peak of fashion. However, some representations contain grossly exaggerated patterns; their misplaced grandeur probably intended to impute vulgarity and lack of discernment.
8 See François Clouet’s Elizabeth of Austria for a similar fabric, a “robe en damas à fond jaune” (damask gown with a yellow ground) (Laver, Plate 57)
9 Thanks to New World colonial cash
10 Boucher, 227. Other references 224-226.
11 Adapted and refined from Landsknecht soldier fashions